Securing database connections with TLS
You can skip this section and go to Configure SQL Network Settings in SQL Server Configuration Manager if you already have the Web Server SH2 certificate.
Important! This is only recommended for production environments, especially in the case of a multi-node installation where SQL Server must be exposed on the network.
Creating a server certificate
Use the following procedures to prepare a SQL server for Secure Connections:
-
Log on to the server.
-
From the Start menu, open Run app.
-
Type mmc and click OK to open the Microsoft Management Console. This is only recommended for production environments, especially in the case of a multi-node installation where SQL Server must be exposed on the network.
-
Navigate to File > Add/Remove Snap-in > Certificates > Add > Computer Account> Next > Local Computer > Finish. Click OK.
-
Expand Certificates (Local Computer) > Personal > Certificates.
-
Right-click in the window and select All Tasks > Request New Certificate.
-
The Certificate Enrollment dialog will open, click Next.
-
Select Web Server SH2 and click the More information is required to enroll for this certificate link to configure settings.
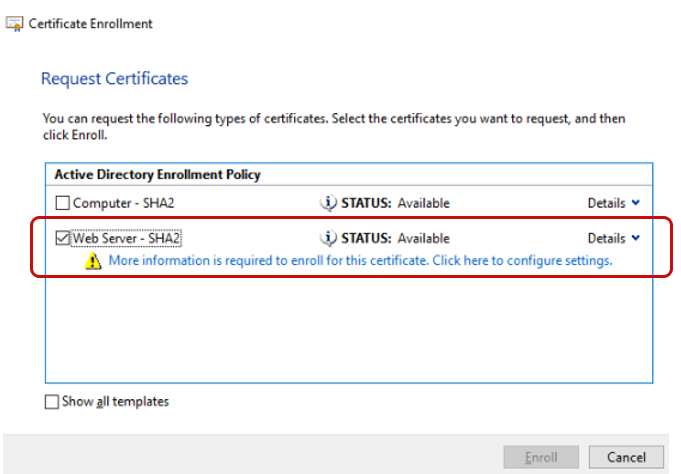
The Certificate Properties dialog appears.
-
On the Subject tab, enter the following:
-
Under the Subject name, select Common name in the Type dropdown menu and provide FQDN of the SQL Host (for example. azr-iee-web-sd2.itron.com), and then click Add.
-
Under Alternative name, select DNS in the Type dropdown menu and enter the following values:
-
FQDN, click Add.
-
HOSTNAME (for example, azr-iee-web-sd2), click Add.
-
localhost, click Add.
-
-
-
On the General tab, enter a friendly name.
-
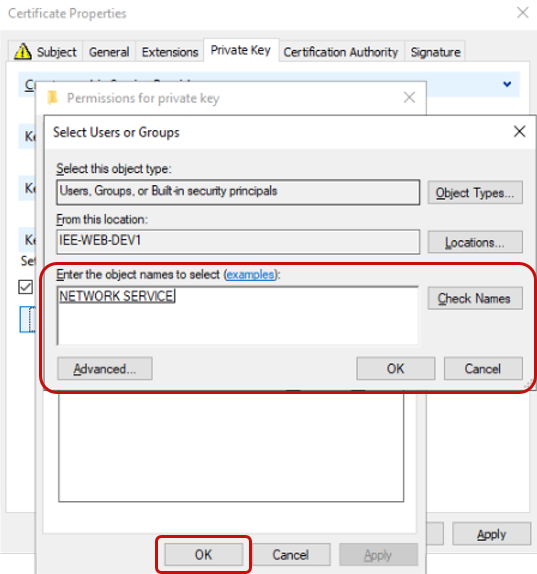
On the Private Key tab, expand Key permissions, select Use custom permission, and then click on Set permissions.
-
Select CREATE OWNER > ADD > Locations > FQDN > OK.
-
-
In the "Enter the object names to select" text area, enter network, click check names, select Network Service, and then click OK.
-
On the Security tab, select Read in the Permissions for NETWORK SERVICE section and click OK.
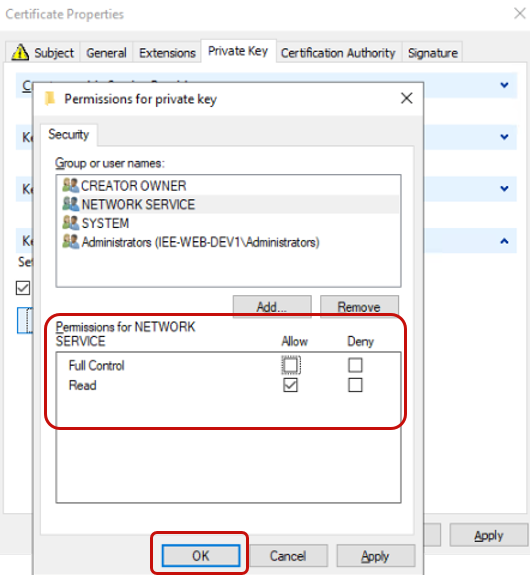
- Click OK.
- Click Enroll, and then click Finish once completed.
Tip: To see the newly created certificate, go to Certificate Store > Personal Certificates on your machine.